| HISTORY |
|
|
Lead ship of
her class,
Scharnhorst was built in Wilhelmshaven. Laid down in
June 1935, she was launched in October 1936 and completed in January 1939.
The ship was armed with a main battery of nine 11 in guns in three triple
turrets. Plans to replace these weapons with six 15 in guns in twin turrets
were never carried out.
Scharnhorst and Gneisenau operated together for much of
the early portion of World War II, including sorties into the Atlantic
to raid British merchant shipping. During her first operation, Scharnhorst
sank the auxiliary cruiser HMS Rawalpindi in a short engagement
in November 1939. The twins participated in Operation Weserübung,
the German invasion of Norway in the spring of 1940. During operations
off Norway, the two ships engaged the battlecruiser HMS Renown and
- in separate engagements - sank the aircraft carrier HMS Glorious
as well as her escort destroyers Acasta and Ardent. In that
engagement, Scharnhorst achieved one of the longest-range naval
gunfire hits in history, but also suffered a torpedo hit by one of the
British destroyers.
Post-repairs, the pair sortied on a commerce-raiding cruise into the
Atlantic, Operation Berlin. From late January through March 1941, the raiders
hunted British shipping in the North Atlantic, culminating in Scharnhorst
sinking nine merchant ships over several days mid-month. Narrowly avoiding
a clash with the British battleships King George V and Rodney,
Scharnhorst and Gneisenau sailed for Occupied France, arriving
in the port of Brest on March 22, 1941.
Scharnhorst was severely damaged during an RAF raid on July 24,
1941 while docked in La Pallice, Occupied France. As a result, she
returned to Brest for dry-docking and repairs.
In early 1942, after repeated British bombing raids, the two ships
joined by the heavy cruiser Prinz Eugen - made an audacious daylight
dash up the English Channel from occupied France to Germany, during Operation
Cerebus. Scharnhorst twice struck mines during the Channel Dash,
being disabled for short periods after each mining.
Post-Cerebus repairs in Kiel last until July 1942, but the ship was
in and out of the shipyard for various issues until early 1943.
In March 1943,
Scharnhorst joined Tirpitz in Norway to interdict
Allied convoys to the Soviet Union. The two battleships sailed together
to attack the island of Spitzbergen in September 1943.
Sailing to interdict an Allied convoy bound for Russia, Scharnhorst
and her escorting destroyers sortied from their lair on Christmas Day,
1943. Unfortunately, the British were aware of the German intentions
Scharnhorst was sailing into a trap. During the ensuing Battle of
the North Cape on December 26, 1943, the Royal Navy battleship HMS Duke
of York overwhelmed and sank
Scharnhorst. Only 36 men were rescued,
out of a crew of 1,968.
For more on Scharnhorst, visit her Wikipedia page
here,
which is where this abridged history was pulled from. |
|
|
| The
Flyhawk Scharnhorst
Flyhawks 1/700 Scharnhorst comes in the
familiar Flyhawk box with an evocative painting of Scharnhorst illuminated
by star shells during the Battle of the North Cape. Inside the box, there
is - along with hull and all the sprues - a separate painting of the box
art, instructions, decals, a very small fret of photo-etch (this is the
regular version of the kit) and a mask to help paint the aerial recognition
markings Scharnhorst carried on her deck forward and aft. |
|
|
| THE
HULL AND DECKS |
|
| The hull and decks come wrapped separately
in a white material to protect them from the rest of the kit contents.
Unfortunately, the main deck and the waterline plate both had damage to
the forward tip of each part. Meanwhile, the hull scales out pretty
much perfectly in length and beam. |
|
|
| SPRUE
B - MAIN DECK |
| Scharnhorsts
one long deck comes as one piece. As mentioned, the bow was damaged, bent
up at the forward tip. There is very nicely done engraved planking on the
deck, with butt ends. The anchor chains are molded onto the deck, but look
pretty good. I think only the super detailers will shave them off
and replace them. There are small cuts outs in the deck for it to fit corresponding
areas on the upper hull where the chocks and holes for the davits are.
The hatches and other small parts look good, with raised details (depending
on the part). |
|
|
| SPRUE
C - WATERLINE PLATE |
|
| It's a waterline plate...with a bent
tip. |
|
|
| SPRUE
D - LOWER HULL |
|
| Some faint mold lines, but overall
good. The forefoot is, for some reason, a separate part. |
|
|
| SPRUE
F - FORE FOOT |
|
| This attaches to SPRUE D, for those
non-purists building a full hull model. There is a bump on the bow
of the part, which must be meant to replicate the attachement point for
the paravane chains. |
|
|
| SPRUE
Y - UPPER HULL |
|
| The hull is well molded, with eyebrows
over the portholes, a restrained strake on the hull, and an interesting
feature that has the holes for the boat davits molded as part of the deck,
with an matching cut out on the main deck. The instructions tell you to
remove some detail and fill some portholes, which seems to indicate that
other versions of the twins would be forthcoming. The detail
is light years ahead of the old Tamiya kit, shown for reference in a few
photos. |
|
|
| Here are the hull and decks
dry fit together. |
|
|
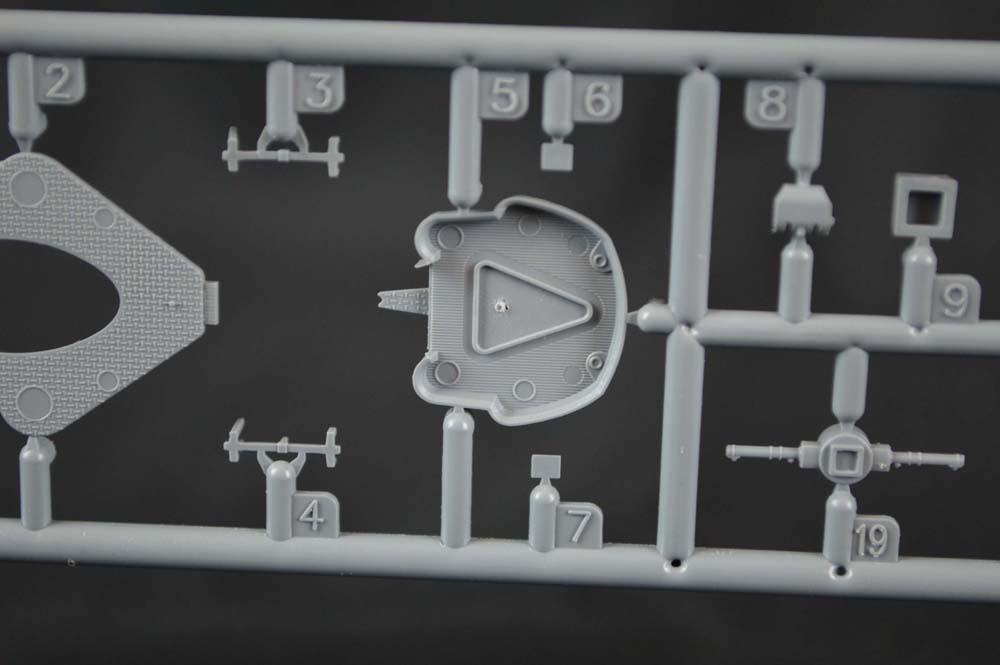
| SPRUE
E (X2) |
|
| This sprue is where youll find
the main battery turrets and the single 5.9 gun mounts, along with the
main battery rangefinders, barrels (two versions with and without blast
bags) and torpedo tubes. The barrels of the 11 inch guns feature open muzzles.
The detail on the main battery turrets and the armored shields for the
5.9 inch guns is very good. It looks overstated in digital photos,
but the Mk 1 eyeball, it looks great. |
|
|
| SPRUE
G |
|
| This is part of the aft superstructure,
and its got lots of great detail, with nicely done watertight doors, planking
and vents. The cabling is especially well done. |
|
|
| SPRUE
H |
|
| This is the base for the AA rangefinders
that are located by the funnel. Its got nice tread plating detail and
well done watertight doors. |
|
|
| SPRUE
I |
|
| The pair of docking bridges and some
vents are on this sprue. Even though this is the basic version of the
kit, the supports for the docking bridges should have been done in photo-etch.
Some of the vents have sublte details in their openings. |
|
|
| SPRUE
J |
|
| This
part is the base of the mid-ship deckhouse that supports the funnel and
the heavy AA guns. Its the bulkheads only no deck (thats a separate
part). More good detail on the bulkheads portholes, scuttles, w/t doors
and cable reels. |
|
|
| SPRUE
K |
|
| The only part on this sprue is the
base of the funnel, below the searchlight platform. The detail is, as everywhere
else on the model, really good. |
|
|
| SPRUE
L |
|
| Another one part sprue, this is the
hangar structure. More good detail abounds, with portholes, vertical ladders,
piping as well as detail on the interior of the hangar bulkheads. Though
since the sliding roof for the hangar doesn't look like it can be posed
open, and there is a large L1 part number stamped inside the hangar,
Im not sure you would be able to pose it in the open position, without
a little work. |
|
|
| SPRUE
M |
|
| This
is the structure that the tower sits on. More great detail, with
bracing inside the splinter shields, portholes, nicely done watertight
doors and piping/cabling on the bulkheads. |
|
|
| SPRUE
N |
| Director
bases. Same comments as above |
|
|
| SPRUE
O |
| This is one of the largest parts in
the kit, and also one of the most impressive. It consists of the
bulk of the forward superstructure and the barbette for Turret Bruno. The
forward part of the superstructure is a separate piece (sprue R). Lots
of excellent detail here portholes, vents, piping, planking, scuttles. |
|
|
| SPRUE
P |
| The lowest level of the aft
superstructure. The detail on the scuttles/armored shutters is outstanding. |
|
|
| SPRUE
Q |
| This small part is the conning tower.
Well molded with great detail. |
|
|
| SPRUE
R |
| This is the forward part of the forward
superstructure. Im not sure why its molded separately I dont know
if there were any difference between the sisters. I think its more to
facilitate the details molded onto the 01 level deck. Anyway, the
detail is just as good as Sprue O, the deck detail on the open bridge is
especially good. |
|
|
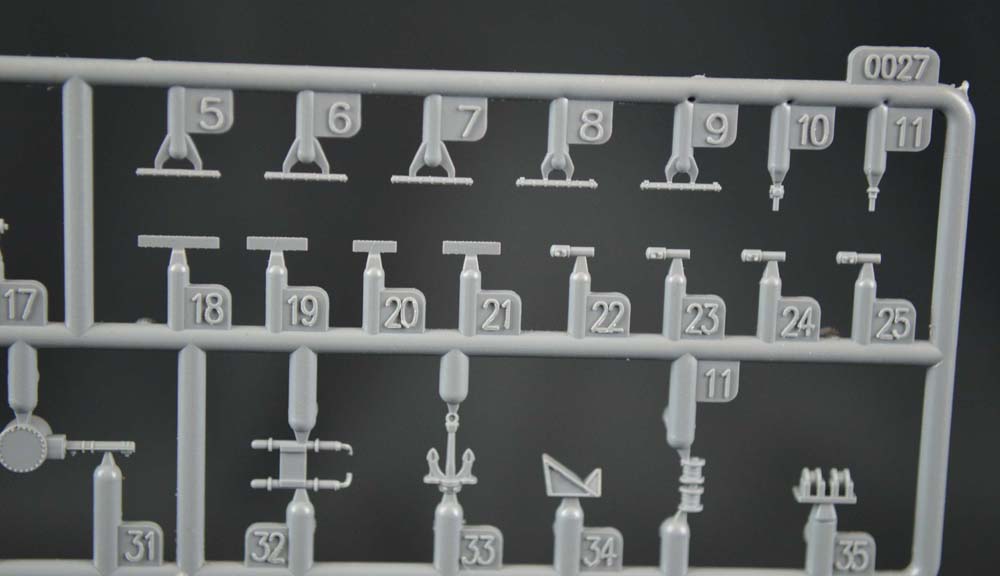
| SPRUE
S |
| This is the largest sprue in the kit,
and is chock full of nice parts: props, shafts, struts, rudders, breakwater,
anchors, masts, platforms and other assorted parts. |
|
|
| SPRUE
T |
| The deck that sits on top of Sprue
J and supports the funnel and AA guns, another forward superstructure deck,
the funnel cap, other platforms, the sliding top of the hangar and parts
of the forward tower are on this sprue. Detail is really good, especially
on the decks Flyhawk does a fantastic job reproducing tread plating and
planking. There's a lots of great little details on some of
the smaller parts as well. |
|
|
| SPRUE
V |
| The top platform of the tower, the
searchlight platform on the funnel, some vents, directors and platforms
can be found here. Again, the deck detail is sublime. |
|
|
| SPRUE
W |
| Director towers, cranes and their
bases, reels and anchors are this sprue. The cranes are nice, photo-etch
won't be much of an improvement, if at all. |
|
|
| SPRUE
X (X2) |
| There are some AA platforms and the
gun tubs for the AA that sit on the secondary turrets here. Good
detail on the decks. |
|
|
|
| SPRUE
DE02 (X2) |
| The Scharnhorst's motor
boats are on this sprue. There's some nice detail on the foredeck
and portholes on the hulls. |
|
|
| SPRUE
DE03 |
| Lots of boats here - nice
interior detail, including thwarts and planking on the decks. |
|
|
| SPRUE
DE04 (X2) |
| Here you'll find the Arado
float planes. Flyhawk does a nice job on their aircraft.
There are nice details (I use that phrase a lot, don't I?) with options
for the wings to be folded or not. |
|
|
| SPRUE
DE05 |
| The little square lift
rafts on this sprue have strap detail on the inside of the raft. |
|
|
| SPRUE
DE06 |
| Torpedoes tube parts,
paravanes and rangefinders. |
|
|
| SPRUE
DE07 |
| Small AA weapons are here.
The 37mm twin AA gun barrels are particularly fine, a few of the barrels
have flash on the muzzles. |
|
|
| SPRUE
DE09/10 (X2) |
| These two sprues are molded
together. Sprue 9 has rangefinders and what looks like optical
equipment, while Sprue 10 has the searchlights. The faces of
the searchlights have shutter detail! |
|
|
| SPRUE
DE11 (X2) |
| There are more ships boats
on this sprue. |
|
|
| SPRUE
DE12 (X2) |
| Here are some very nice
cable reels, with detailed cables on the spools, with some paravanes and
other assorted equipment, including what looks like the catapult. |
|
|
| SPRUE
DE14 (X2) |
| More AA guns. There
is some minor flash on some of the muzzles of the gun barrels. |
|
|
| SPRUE
DE15 (X2) |
| This sprue has the twin
secondary turrets and barrels, which feature barrels both with and without
blast bags. The is texture to the blast bags, and raised detail on
the turrets. |
|
|
| SPRUE
DE22/23/24 |
| This is another set of
multiple sprues that are molded together. There is more AA
guns on sprue 22, rafts (with nice interior detail) and some really freaking
tiny parts on sprue 23 and the heavy 105mm AA guns on sprue 24. |
|
|
|
| PHOTOETCH |
|
| As this is the basic edition of Scharnhorst,
there are only two very small photo-etch frets included with the model. |
|
|
|
|
|
|
| DECALS |
|
| There is a small set of decals in
the kit. Here youll find the aircraft markings, multi-part swastikas,
the ships crest and the flags. |
|
|
| MASKS |
|
| This is a really nice addition - a
mask to mark off and paint the aerial recognition markings on the decks.
What a brilliant idea! |
|
|
| INSTRUCTIONS |
|
| The instructions are the now familiar
Flyhawk format, on glossy two sided heavy paper. There are 16 steps for
Scharnhorst and two for the A/C - one for each type of wing (folder
or unfolded). The instructions feature exploded view
drawings with colored highlights, that are logical and look easy for follow.
The last page of the instructions has shows both
plan and profile (both port and starboard) of Scharnhorst, and plan
and profile of the Arados, all in color. The instructions reference
both "WEM" Colourcoats (Flyhawk hasn't gotten that memo yet, apparently)
and Mr Hobby paints. The bottom of page 3 also has colors and/or
mix formulas for Tamiya paints. |
|
|
|
|
|
| |
|
| CONCLUSIONS |
|
| This kit is another homerun for Flyhawk,
who continue to the leader in 1/700 injection molded ship model kits.
It's finely molded, has great detail and certainly looks like the very
handsome, but tragic, German battleship.
This is Flyhawks 1/700 HMS Scharnhorst,
kit number FH1148. The kit appears to retail for around $38.00.
Remember, this is the basic version, and contains only a small bit of photo-etch.
There is a "Special Accessory Box" for this model available separately.
Highly Recommended!!
Thanks to
Flyhawk
for the review sample. This is an in box review, your mileage may vary
once you start assembly. |

|