The USS Laffey DD-459 was a Benson class destroyer built by the Bethlehem
Shipbuilding Company in San Francisco, California in 1941. She was commissioned
March 31, 1942, with Lieutenant. Commander William E. Hank in command.
Laffey spent the next few months sailing up and down the West Coast on
her shakedown cruise. With the bugs worked out the ship sailed for Pearl
Harbor and headed right into the thick of the action. The situation in
the Pacific was critical and the Japanese seemed to be unstoppable. When
the Japanese landed on Guadalcanal and began work setting up an airfield,
Laffey Buchanan, Aaron Ward and other destroyers joined Task Force 18 built
around the USS Wasp and headed for the area. Laffey was too late to participate
in the first battle of Savo Island that resulted in the loss of four Allied
cruisers. Wasp and her escorts launched attacks on Tulagi, Gavutu, Tanambogo,
and other targets in the Guadalcanal area. On September 15, 1942 the Japanese
submarine I-19 launched a spread of six torpedoes that hit not only the
Wasp, but also destroyer O'Brien and Battleship North Carolina. The Wasp
was fatally damaged and the fires were uncontrollable. The Wasp had to
be scuttled and Laffey took on survivors and returned them to Espiritu
Santo.
Laffey returned to Guadalcanal and saw her first surface action
at the Battle of Cape Esperance in October 11-12 often referred to as Second
Savo. Sistership Farenholt led Duncan and Laffey followed by San Francisco,
Boise, Salt Lake City, Helena, Buchanan, and McCalla into the waters south
of Savo Island. Thanks largely to the superior radar on the Helena and
Boise, Admiral Scott commander of Task Force 64 succeeded in crossing the
"T" of the enemy. The lead destroyers executed what was supposed to be
a column turn, but were thrown into disarray when San Francisco executed
a simultaneous turn instead of following in the wake of the ship ahead.
Going to full speed Lt. Commander Hank was able to get back in the new
line as they counter marched in front of the oncoming enemy ships. Farenholt
and Duncan were not so lucky and soon found themselves in-between the opposing
forces. Admiral Scott was able to overcome the confusion and after a few
miscues brought all his guns to bear. When the order to open fire was given
Laffey unloaded on the Aoba with three of her four 5" guns. When the smoke
cleared Aoba was badly damaged, Furataka was sinking, and destroyer Fubaki
had sunk. On the American side the Duncan was sinking, and the Boise and
Farenholt were badly damaged. Laffey and the other ships headed for home.
Before reaching the safety of the anchorage at Noumea. The undamaged ships
were called on to rendezvous with another group of ships sailing with more
transports bound for Lunga Point on Guadalcanal.
November 11th found the Laffey guarding those transports as they
unloaded their troops and supplies on the beach. Thanks to aircover, the
US Ships were generally safe during the day. However when night fell, the
advantage shifted to the Japanese who would sail down the slot and bombard
Henderson field with devastating shellfire on an almost nightly basis.
When a Japanese task force with two battleships was spotted steaming for
Guadalcanal, the transports were withdrawn with Laffey and the other fighting
ships. As they cleared the area Laffey, second in a line of 13 US ships
turned to intercept a Japanese task force. Laffey was on a mission against
overwhelming odds. Stop the Japanese from bombarding the Marines on Henderson
field. The American force consisted of five cruisers, two heavies; San
Francisco, and Portland, and three light cruisers Helena, Atlanta, and
Juneau. Eight destroyers, the Cushing, Laffey, Sterret, and O'Bannon led
the way in the van with the Aaron Ward, Barton, Monssen and Fletcher bringing
up the rear. Half of the destroyers present were Benson and Gleaves classes
then the workhorses of the war. All of this group would be lost in the
waters of Guadalcanal, three in this one battle alone.
The ships were just executing a turn to the North when out of
the blackness two Japanese destroyers raced in front of the formation.
As they passed to starboard, the Japanese cruiser Nagara and Battleships
Hiei and Kirishima bore down on them flanked by destroyers. With
what was thought to be the Nagara in their sites Lt. Tom Evin's the torpedo
officer called out "I request permission to fire.". Lt. Commander Bill
Hank, the Laffey's captain replied immediately "Permission NOT granted".
There was still no order to open fire. The situation was unfolding so rapidly
that Admiral Callaghan must have been overwhelmed by the multiple sightings.
At 0150 early Friday the 13th the Japanese searchlights snapped on, illuminating
the Atlanta in a blinding bright light and sweeping up and down the American
column. There was no need to wait for further orders to fire as instinct
took over and all hell broke loose. The Laffey began pumping shells into
the Akitsuki. Suddenly her attention was directed towards the massive pagoda
mast of the Hiei bearing down on them. It was too late to turn and the
only option was to increase speed and try to clear the beast. The collision
alarm was sounded and torpedoes were launched although range was probably
too close. The Laffey raked the superstructure of the Hiei was ever gun
that could bear from the 20 mm to the 5". Although the battleship was well
armored in the vital spaces the bridge was not well protected and numerous
fires were started. The shell fragments wounded Admiral Abe and Hiei
was fast becoming an ineffective fighting ship. Never the less, machine
gun fire from the battleship rained down on the Laffey as she cleared the
battleship with barely 20 yards to spare as shown on the stunning box art
by Satake. They were so close that the big 14" guns of Hiei were unable
to depress low enough to fire on the Laffey. As she sped along away from
the massive battleship, the machine guns were no longer able to reach her.
However the Hiei now was able to use her 14" guns and she scored direct
hits on the Laffey wrecking the destroyers. To add insult to injury, a
torpedo slammed into her fantail stopping her dead in the water. The order
to abandon ship was given and moments later a massive explosion ripped
the destroyer apart and she disappeared under the waters of Iron Bottom
sound with heavy loss of life. There would be no bombardment of Henderson
field that night. Many sailors on the Laffey and the other ships paid the
ultimate price to prevent it. Her point blank fire on the Hiei contributed
to the loss of that ship as the sun came up later that morning.
In 1992 Dr. Robert Ballard of Titanic fame conducted an expedition
on the "The
Lost Ships of Guadalcanal". One of the ships found was the USS Laffey
and her wreck is remarkable intact. Her guns remain pointed out to port
as in the dramatic painting above. Laffey was awarded the Presidential
Unit Citation for her gallant performance at Guadalcanal. Three battle
stars were awarded for her short World War II service. The first for the
battle of Cape Esperance October 11-12, 1942. The second for the Capture
and Defense of Guadalcanal November 12th, and the final for her the action
on Friday the 13th, 1942.
|
 This
new 1/700 smart kit from Dragon represents a major step forward for those
of us who model in the divine scale! If you were impressed with the 1/350
USS Laffey, you will be even more impressed with this smaller scale
version. It shares many features with it's larger cousin but at only half
the size. A Gleaves class version is also available as the Livermore
and Monssen. This
new 1/700 smart kit from Dragon represents a major step forward for those
of us who model in the divine scale! If you were impressed with the 1/350
USS Laffey, you will be even more impressed with this smaller scale
version. It shares many features with it's larger cousin but at only half
the size. A Gleaves class version is also available as the Livermore
and Monssen.
See the preview for some
of the CAD images. Dragon has been listening to what ship modelers are
asking for and this kit proves it. They have engineered the parts to achieve
higher levels of detail than we are accustomed to in plastic. Extensive
use of slide molding allows for accurate shapes and complex details. Before
you read my review, you should know that I took an active part in the design
of this kit and was compensated for my efforts, therefor my opinions may
be a bit biased and I will try to contain my enthusiasm here.
|
|
Built up test shots from Dragon
|
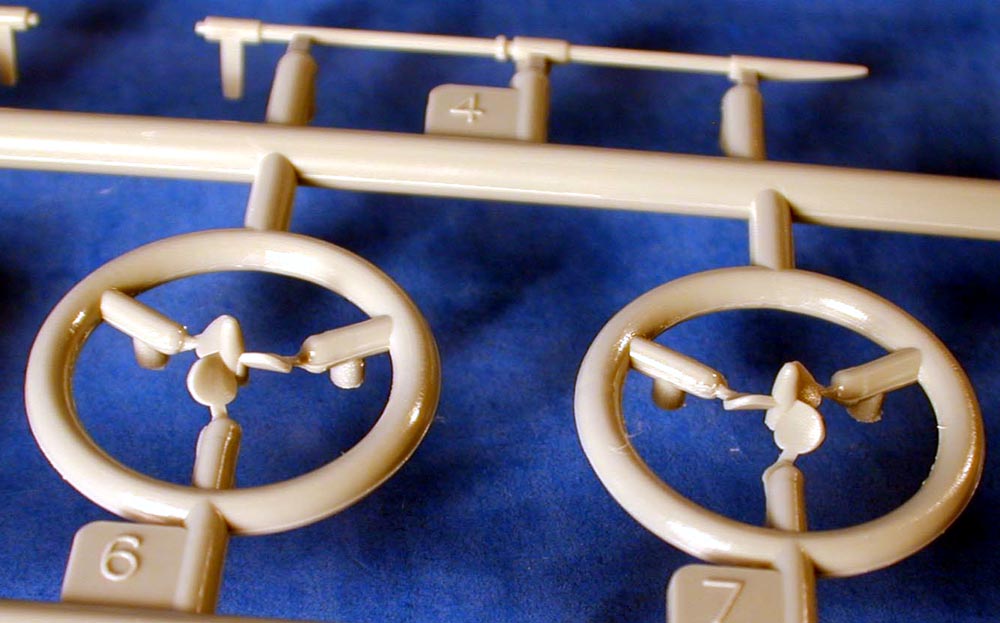
| SPRUE A (x2) |
|
| The forward and aft deck are both cambered like the real
ships. Real ships rarely have flat decks, rather there is a little angle
to them to allow water to run off the sides. Propellers are nicely done
as are the propeller shafts. The struts should have more of a wing shape
to them, but that is not really that noticeable here. |
Click
images
to enlarge |
 |
|
|
| SPRUE C (x2) |
|
| Superstructure parts are included on this sprue with forward and aft
decks included. Two types of aft decks are included, one like the one fitted
to the Buchanan and one like the USS Woodworth DD-460. Note there is some
evidence that Laffey also had this arrangement. So you may want to use
this part instead of the other version. Either way you have a choice. The
other parts on this sprue include the walls of the superstructure. They
have plenty of surface detailing. The typical flat sided funnels of the
Benson class are well done. These parts are slide molded to give the tops
an open appearance. Separate funnel piping is provided to give the kit
a more detailed appearance. |
 |
| There are also some forming tools provided to form the
life raft brackets and the propeller guards.
|
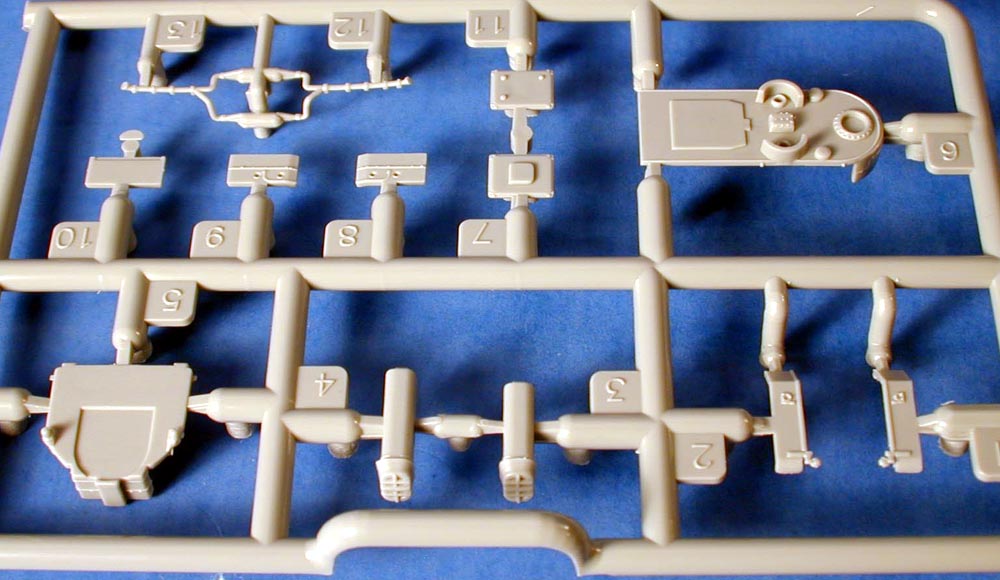
| SPRUE D (x2) |
|
| Depth charges and other fittings are included on this sprue. K-gun
launchers are well molded and the extra charges are molded in groups of
two. Many other parts not typically seen in this scale are included such
as the 5" practice loading machine, sky lookouts, and torpedo director.
The lone 1.1" gun assembly is done in 4 pieces. Some of the parts are so
small that some modelers may be intimidated by them. But detail lovers
will go crazy with them. I would add that if you don't need to add all
the tiny parts to have a good looking representation of a Benson class
destroyer. The 26' Whaleboats have separate tops to allow you a covered
or undecked version. |
 |
|
|
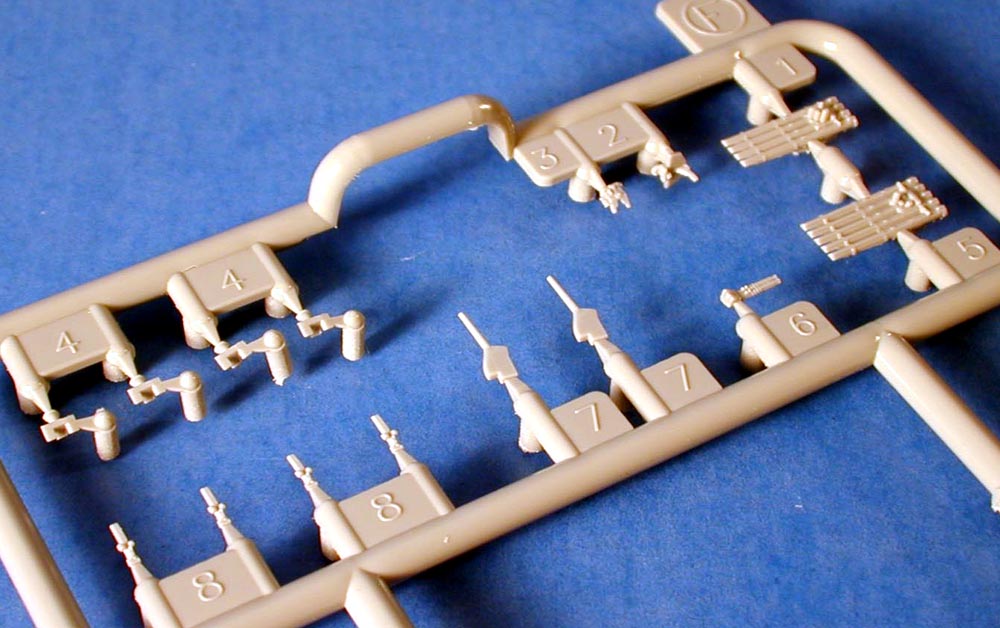
| SPRUE F (x4) |
|
| This sprue has some highly detailed torpedo mounts. You will only need
the quintuple version here. A 40 mm twin mount is included in three parts.
Four 20 mm twin style mounts are included but you will use the 20 mm singles
on the next sprue on these ships. The 5" blast bag equipped gun barrels
are actually slide molded to allow for an opening in the barrel. You will
need glasses to see them, but they are there. |
 |
|
|
| SPRUE H (x4) |
|
| The bottom of the 5" gun base and the movable gun barrel are nicely
molded. I assembled the 5" turret and you can elevate the gun realistically.
There are plenty of 20 mm single gun mounts provided. These are done in
two parts so you can mount the barrel at any realistic angle. The stern
depth charge racks are slide molded in a single piece so they are very
detailed. These parts about as detailed as is possible in plastic. |
 |
|
|
| SPRUE I (x4) |
|
| Dragon has included two distinctly different 5" turrets. For those
who are not aware, most destroyers with the 5" 38 cal gun house had lower
mounts that had reinforced roofs. The blast effect from the upper mount
tended to dent the lower roof and some stiffening was necessary. On most
early DD's this was done by adding an extra knuckle. A stiffening plate
was also riveted to the roof plate. |
 |
| Dragon has reproduced this by molding two version of the turret. This
lower mount has the knuckle and extra rivets. |
 |
|
|
| SPRUE J (x4) |
|
| The upper mount was identical to the lower one, but had a smoother
roof. The turrets also have the correct offset to the gun barrel. A triple
slide is used on these parts to allow for a virtually seamless part. |
 |
| The parts fit together smartly with only a small hint of a seam. Note
the hatch details and the shell extraction chute and the vent on the rear.
I certainly hope Dragon makes these mounts available separately as they
blow away anything else now on the market. |
 |
|
|
|
|
| SPRUE K |
|
| Rather than mold a separate lower hull Dragon has done two versions
of the hull. This one with the complete hull molded in one single piece.
There is no seam to fill here. |
 |
|
|
| SPRUE L |
|
| A waterline style hull is also included identical to the other version
from the waterline up. Both has the classic 40's aerodynamic styling to
the bow. |
 |
|
|
| SPRUE S (x2) |
|
| There are four sprues labeled "S". These are the Square and Oval Life
Rafts, The Mk-37 Directors and their Mk-12 Radar and mount, and several
new searchlights. The directors use triple slide molding to capture the
full detailing, and have separate bottoms. You can clearly make out the
hatches, and ladder details on the sides. The Fire Control Radar Antenna
and mount are three parts, and the stand is also molded using slides. The
yoke for the radar screen is very detailed for such a small part. These
parts are not exactly new, they first appeared in the Dragon
USS Pennsylvania kit a couple of years ago. But they are detailed far
beyond any other plastic parts in this scale. |
 |
Life rafts
 |
 |
 |
 |
 |
Mk-37 Director
 |
 |
 |
 |
 |
Mk-12 FCR
Antenna & mount
 |
 |
 |
 |
 |
Search lights
 |
 |
 |
 |
 |
|
| SPRUE Z |
|
| A new base for this kit has been designed based on how most modelers
like to display their ships in full hull mode. The stands which resemble
lamp finales are even slide molded so they have no seams to fill and sand.
Hole locations are provided so all you have to do is open them up with
a knife or drill. |
 |
|
|
| PHOTOETCH (x2) |
|
| Two simple photo etch frets are included, one for each ship. Bridge
wings, propeller guards, and funnel platforms and ladders are among the
details. Many ships in the Benson Gleaves class has k-gun davits fabricated
to mount to the gun tubs. These are provided and will give the ship a more
detailed appearance. |
 |
| Note the effect that photo etch has on the completed ship.
|
| DECALS |
|
| Walkway decals to represent the rubber no skid pads that
were used on US Navy ships is done on these well registered decals printed
by Cartograph. These are made to match the typical paths they were applied
in. Hull numbers for both Laffey and Woodworth are included. Though they
are hard to see, this sheet even includes draft markings.
A second sheet includes flags and ensigns printed on a pliable vinyl
material. |
 |
 |
|
|
| INSTRUCTIONS |
|
| The instructions are an eight page booklet showing the
assembly in a step by step process that is easy to follow. A full size
camo drawing is provided illustrating the MS-21 camo scheme. If you plan
on painting your ship, then I would change the order of assembly as it
is much easier to attach the decks to the hull without all the fine parts
added. |

|
| CONCLUSIONS |
|
 This
has got to be the most detailed 1/700 kit yet available in plastic now
on the market. The details are extremely fine and the molding is first
class. Not only do you get state of the art molding, you get two complete
kits for one very competitive price of only $19.95. At this price you can
afford to buy extras and use the parts to upgrade other kits. It is available
now at Dragon
USA and your favorite hobby shop. This
has got to be the most detailed 1/700 kit yet available in plastic now
on the market. The details are extremely fine and the molding is first
class. Not only do you get state of the art molding, you get two complete
kits for one very competitive price of only $19.95. At this price you can
afford to buy extras and use the parts to upgrade other kits. It is available
now at Dragon
USA and your favorite hobby shop. |
 |