 |
|
|
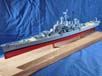
| As a modeler focusing mainly on post-war warships I obviously could not resist acquiring and building the 1/350 USS Salem CA-139 from VeryFire. The contents of the box initially didn't disappoint at all, and I made up my mind to build a straight-out-of-the-box model until I started examining the plastic more closely. While a beginner could build a decent model straight from the box, as a somewhat more experienced model builder, I found some of the plastic parts lacking detail. Additionally, the included photo-etch was very basic, only providing railing for the superstructure, none for the hull, and certainly no radars or the like. | |||||||||
|
Don't get me wrong, this isn't a criticism of VeryFire; they actually released an extensive (and expensive) detail set soon after the kit, containing everything an experienced modeler could wish for. However, that set also might be a bit overwhelming for a beginner. Even I encountered several hurdles during the assembly process. |
 |
||||||||
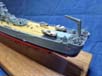
| The hull, the main deck went together without any issues: I always attach the PE railing as soon as possible to airbrush it in the main color. The main deck and shaft and props followed, as well as the decals for the main hull. | 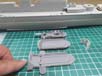 |
||||||||
| Just as I was about to start with the bridge section, Steve Larsen from ModelMonkey introduced a fully 3D-printed bridge for the Salem. Steve based this bridge on the original design drawings and photos he took of the museum ship, ensuring the navigation bridge and flag bridge (complete with interior) were of the correct, slightly later, design. Although the bridge consisted of only four parts, the detail was even better than that of the detail set. The latter would also prove more challenging to build due to the numerous small photo-etched parts. | 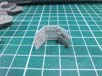 |
||||||||
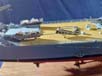
| For the main 8 guns I used the detail set. In most detail sets, you typically get photo-etched railings and metal fittings. However, this set goes beyond that. It includes a new bridge section, metal masts, radars, life rafts, complete sets for the 76mm guns, deck ventilators, and even a resin model of the Piasecki HUP-2 helicopter. Adding veneer decks redefined the term "detail." The gun turrets significantly improved with the addition of nets, ladders, railings, and metal fittings. | 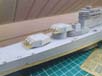 |
||||||||
 |
|||||||||
| The Piasecki HUP-2 and the decals came from the detail set. I found photos of exactly that machine hovering above the Salem. The model was missing the stabilizing fin on the starboard side, but that was added with a piece of Evergreen. |  |
||||||||
 |
|||||||||
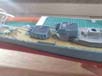
| Also the masts and radars from the detail set were used. The plastic masts and radars in the kit are, for me, too simplistic. I did assemble one of those plastic masts for comparison, as shown in the attached photoand the difference is obvious. The added detail was functional and also easy to build. According to the instructions, you're supposed to insert the metal masts into a recess in the superstructure, but the final construction is too top-heavy for that: I decided to extend the masts with a metal tube and completely drill out the holes. The mast now extends all the way to the bottom of the hull, making the whole thing much sturdier.. |  |
||||||||
 |
|||||||||
|
I also found the included boats in the kit too simplistic, here the detail set didn't offer an alternative. The Salem, serving as the flagship, had two rather luxurious motor launches on the stern for the captain and the commander of the 6th fleet. I found the right boats at Black Cat. They come in one piece with all the details and railings, a testament to what is possible in 3D printing nowadays |
 |
||||||||
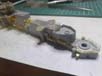
| I did use the detail set for the assembly of the 76mm guns. Each gun piece, and there were 11 of them, consisted of 16 tiny parts emphasis on 'tiny' like minuscule handrails from photo-etch. Those 176 parts really slowed me down, but I did some 'side projects' to keep my interest in model building alive. Eventually, they looked great, but I'm thinking of turning to 3D-printed ones for my next project. | 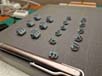 |
||||||||
| For the numerous antennas, I used the photo-etched supports from the detail set since those supports varied considerably. For the antennas themselves, I used metal ones from the unfortunately discontinued SSN-Modellbau. The windows of the bridge and the motorboats were glazed with Humbrol ClearFix. |  |
||||||||
|
|||||||||
| From the standard kit, a less experienced builder can construct a nice,
large model. The construction is well thought out and the kit is very buildable.
However, the detailing, especially of the radars, is minimal. For the advanced
model builder, there is the detail set, which is very comprehensive and
contains everything needed to build a fantastic model. As I mentioned earlier,
I found that set to be somewhat "overengineered" in certain parts. I already
mentioned the bridge and the 76mm guns. Model building is a hobby and should
bring enjoyment, but I can't say that the latter brought me a lot of pleasure,
except when they were complete. That's when I also noticed a slightly misaligned
piece of photo-etched railing, a
missing handle, a barrel that didn't point precisely forward... As an 8-year-old kid, I was content with an Aurora kit consisting of eight parts, but now I crave more and don't shy away from intricate details. However, then and still now, my main goal is to enjoy the hobby and ultimately feel satisfied and fulfilled when I look at a model in my display case. And I must say, I am extremely pleased with this USS Salem model. |
 |
||||||||
More
of Walter Sonderman's work.
Updated 3/21/2024

© ModelWarships.com